Java Attach Principles and Practices
The Attach mechanism was introduced in JDK 1.6, which mainly injects a Java Agent into the running Java process. Java Agent has a wide range of usage scenarios, such as Java performance diagnostic tools such as jstack, jmap and Arthas, which all use this technology.
This chapter will introduce the Attach technology from multiple aspects, including the basic usage of the Attach API, implementation principles, open source tools, and common pitfalls.
1.1 Introduction to Attach API
Starting from JDK 1.6, it is possible to use the Attach API to connect to the target JVM and have the target JVM load a
Java Agent.
The package name of the Attach API is com.sun.tools.attach. As shown in Figure 1, it mainly contains two classes:
VirtualMachine and VirtualMachineDescriptor.
Figure 1 Attach API official documentation
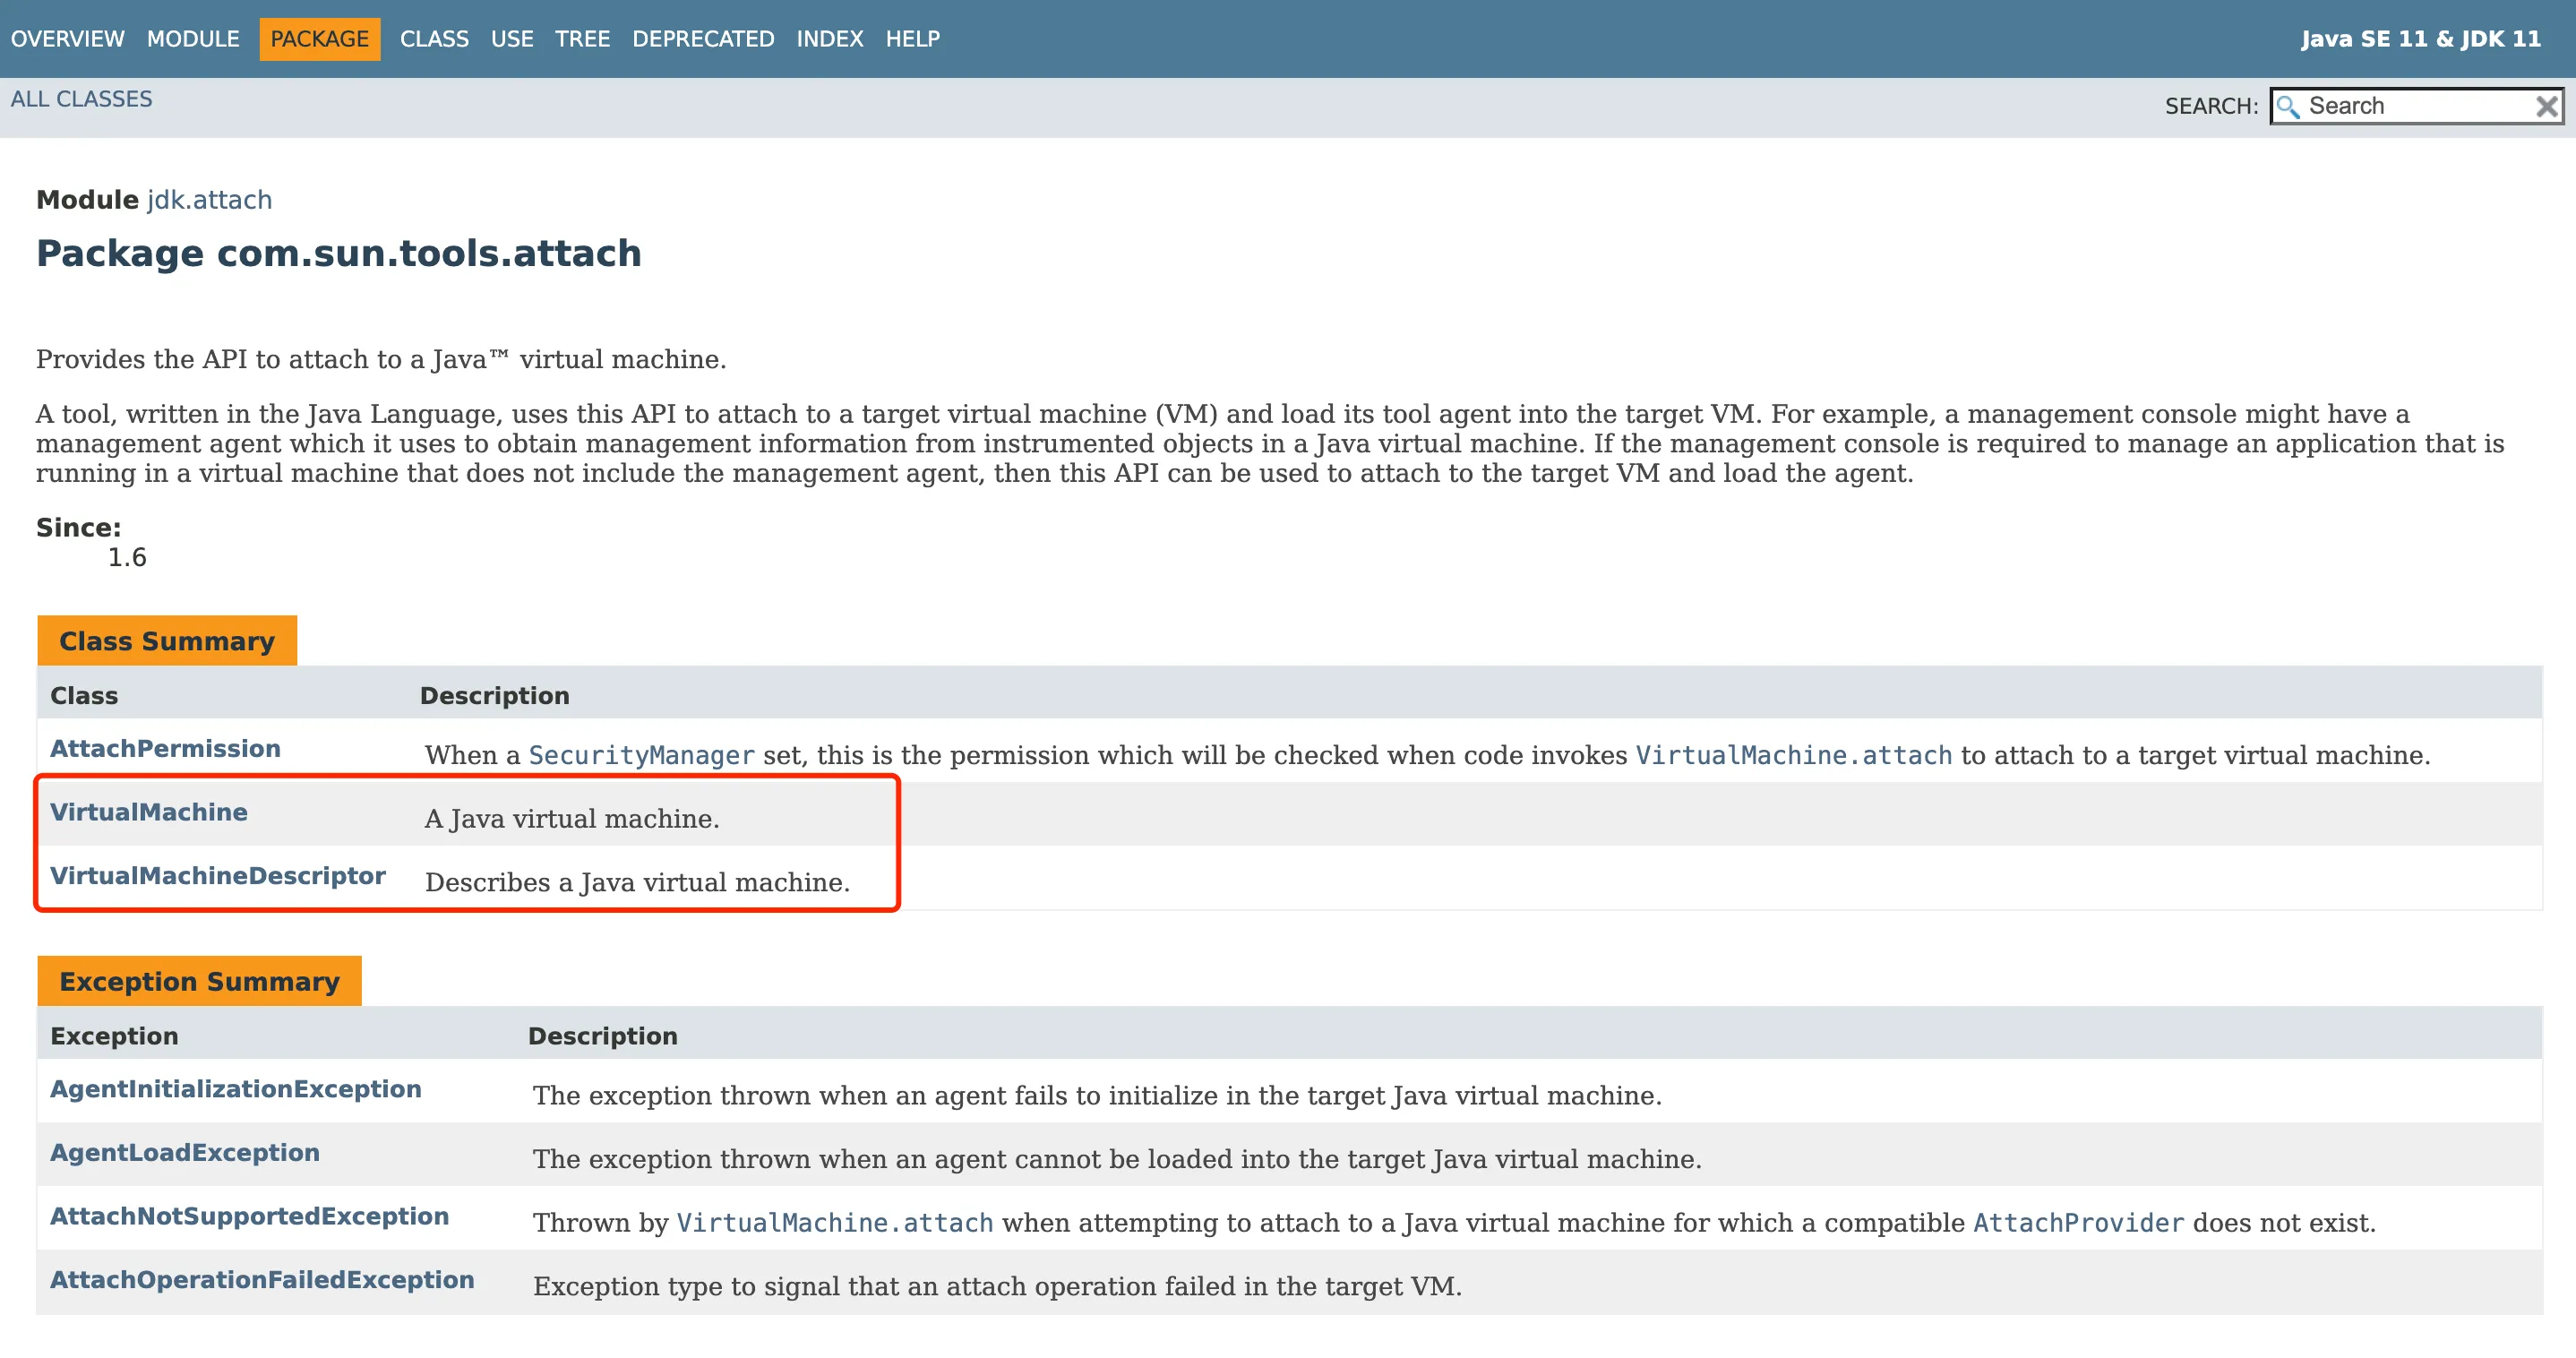
VirtualMachine represents a Java virtual machine, i.e. the monitored target VM, and VirtualMachineDescriptor is used to describe information about the virtual machine, working together with the VirtualMachine class to complete various functions.
Most of the functionality is implemented in VirtualMachine and its subclasses, while other classes provide auxiliary
functions. The following code uses the Attach API to connect to a JVM process with PID 72695, then reads the target
JVM’s system parameters and prints them to the terminal, and finally calls the detach method to disconnect from the
target JVM.
import java.util.Properties;
import com.sun.tools.attach.VirtualMachine;
public class Main {
    public static void main(String[] args) throws Exception {        // attach to target VM        VirtualMachine vm = VirtualMachine.attach("72695");
        // read target vm system properties        Properties properties = vm.getSystemProperties();        for (Object key : properties.keySet()) {            System.out.println(key + "=" + properties.getProperty(key.toString()));        }
        // detach        vm.detach();    }}
The above code outputs the system property parameters of the target JVM, with the results shown below.
java.runtime.name=Java(TM) SE Runtime Environmentjava.protocol.handler.pkgs=org.springframework.boot.loaderjava.vm.version=25.261-b12gopherProxySet=falsejava.vm.vendor=Oracle Corporation// ... other parameters omittedIn line 9 of the code above, one can clearly see that after calling the attach method, a VirtualMachine object representing the target JVM is obtained. By calling methods on this VirtualMachine object (for example, calling getSystemProperties at line 12), you can perform operations on the target JVM. In addition to retrieving the target JVM’s system parameters, VirtualMachine also has the following methods, as shown below.
// List all JVMs on the current hostpublic static List<VirtualMachineDescriptor> list()
//Execute attach/detachpublic static VirtualMachine attach(VirtualMachineDescriptor vmd)public abstract void detach() throws IOException
//Load Agentpublic abstract void loadAgentLibrary(String agentLibrary, String options)public void loadAgentLibrary(String agentLibrary)public abstract void loadAgentPath(String agentPath, String options)public void loadAgentPath(String agentPath)public abstract void loadAgent(String agent, String options)public void loadAgent(String agent)
// Get JVM system propertiespublic abstract Properties getSystemProperties() throws IOExceptionpublic abstract Properties getAgentProperties() throws IOException
// Start the JMX management agent in the target VMpublic abstract void startManagementAgent(Properties agentProperties) throws IOExceptionpublic abstract String startLocalManagementAgent() throws IOException;
1.2 Implementation principle
In the previous section, the basic use of Attach API was introduced. This section will analyze the principle in combination with JDK source code. The Attach mechanism is essentially a communication between processes. The external process connects to the target JVM through the socket provided by the JVM and sends instructions. The target JVM accepts and processes the instructions and then returns the processing results.
1.2.1 Attach client source code analysis
With the API usage foundation in the previous section, we will analyze the implementation principle of Attach API and
parse the corresponding source code to explore more available functions. VirtualMachine is an abstract class. Virtual
machines from different manufacturers can implement different VirtualMachine subclasses. HotSpotVirtualMachine is the
VirtualMachine implementation officially provided by HotSpot. It is also an abstract class and has its own
implementations on different operating systems. For example, on Linux systems, the name of the implementation class of
the JDK11 version is VirtualMachineImpl (the name of the implementation class on JDK8 is LinuxVirtualMachine). The
inheritance relationship of the VirtualMachine implementation class on JDK8 is shown in Figure 2:
Figure 2 Inheritance relationship of VirtualMachine implementation class

First, let’s take a look at the loadAgentLibrary method of the HotSpotVirtualMachine class
Code location: src/jdk.attach/share/classes/sun/tools/attach/HotSpotVirtualMachine.java
private void loadAgentLibrary(String agentLibrary, boolean isAbsolute, String options)    throws AgentLoadException, AgentInitializationException, IOException{    if (agentLibrary == null) {        throw new NullPointerException("agentLibrary cannot be null");    }
    // jdk11 returns the string "return code: 0"    String msgPrefix = "return code: ";    // Execute the load command to transfer the agent jar path and parameters to the target jvm InputStream in = execute("load",                             agentLibrary,                             isAbsolute ? "true" : "false",                             options);    try (BufferedReader reader = new BufferedReader(new InputStreamReader(in))) {        String result = reader.readLine();        // 返回结果        if (result == null) {            throw new AgentLoadException("Target VM did not respond");        } else if (result.startsWith(msgPrefix)) {            int retCode = Integer.parseInt(result.substring(msgPrefix.length()));            if (retCode != 0) {                throw new AgentInitializationException("Agent_OnAttach failed", retCode);            }        } else {            throw new AgentLoadException(result);        }    }}
The above code is to load a Java Agent. The core implementation is in the execute method. Let’s take a look at the
source code of the execute method:
// Execute the given command on the target JVM, which needs to be implemented by the subclassabstract InputStream execute(String cmd, Object ... args) throws AgentLoadException, IOException;execute is an abstract method that needs to be implemented in the subclass. Most of the other methods in the HotSpotVirtualMachine class will eventually call this execute method.
Let’s take a look at the implementation class LinuxVirtualMachine code on the Linux system.
Code location: src/jdk.attach/linux/classes/sun/tools/attach/VirtualMachineImpl.java
VirtualMachineImpl(AttachProvider provider, String vmid)    throws AttachNotSupportedException, IOException{    super(provider, vmid);
    int pid;    try {        pid = Integer.parseInt(vmid);    } catch (NumberFormatException x) {        throw new AttachNotSupportedException("Invalid process identifier");    }
    // Find if the socket file exists in the /tmp directory    File socket_file = new File(tmpdir, ".java_pid" + pid);    socket_path = socket_file.getPath();    if (!socket_file.exists()) {        // Create attach_pid file        File f = createAttachFile(pid);        try {            // Send kill -3 to the target JVM signal            sendQuitTo(pid);
            // Wait for the target JVM to create a socket file            final int delay_step = 100;            final long timeout = attachTimeout();            long time_spend = 0;            long delay = 0;            do {            // Calculate waiting time            delay += delay_step;            try {                Thread.sleep(delay);            } catch (InterruptedException x) { }
            time_spend += delay;            if (time_spend > timeout/2 && !socket_file.exists()) {                sendQuitTo(pid); // Send kill -3 signal            }            } while (time_spend <= timeout && !socket_file.exists());
            // After the waiting time is over, confirm whether the socket file exists            if (!socket_file.exists()) {                throw new AttachNotSupportedException(                String.format("Unable to open socket file %s: " +                "target process %d doesn't respond within %dms " +                "or HotSpot VM not loaded", socket_path,                pid, time_spend));            }        } finally {            // Finally delete the attach_pid file            f.delete();        }    }
    // Confirm the socket file permissions    checkPermissions(socket_path);
    // Try to connect the socket to confirm that it can connect to the target JVM    int s = socket();    try {        connect(s, socket_path);    } finally {        close(s);    }}
Let’s sort out the attach communication process again:
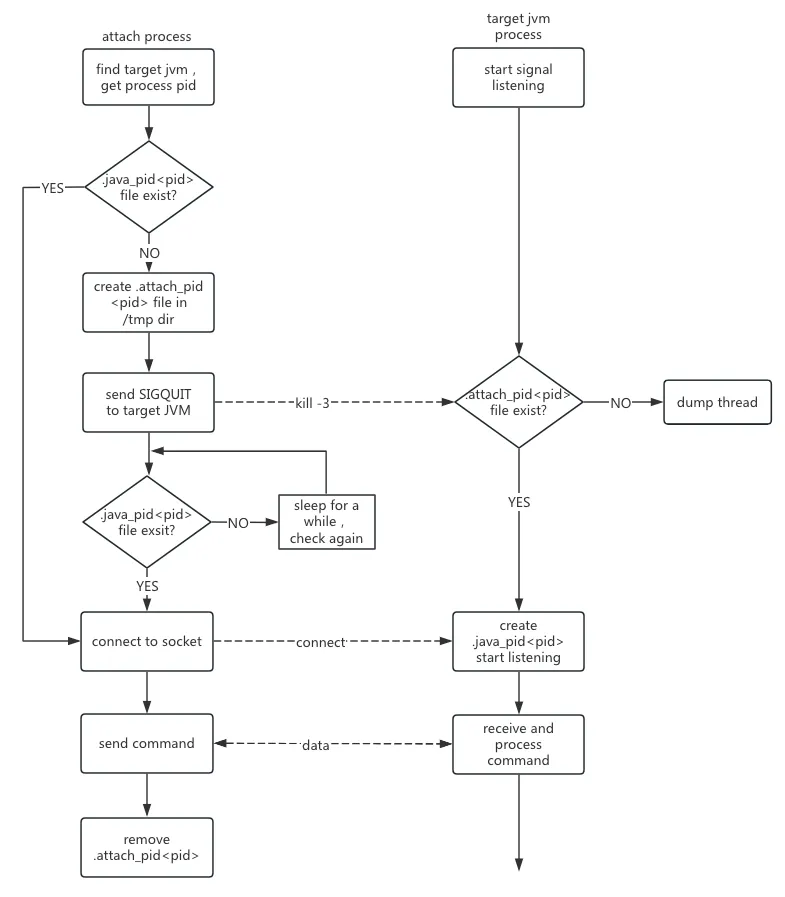
Step 1: The process that initiates the attach searches the /tmp directory to see if the target JVM has created .java_pid$pid. If it has, jump directly to step 6;
Step 2: The attach process creates the handshake file .attach_pid$pid for socket communication;
Step 3: The attach process sends SIGQUIT (kill) to the target JVM -3) signal, prompting the target JVM external process to initiate an attach request;
Step 4: The attach process loops and waits for the target JVM to create the .java_pid$pid file;
Step 5: Delete the handshake file .attach_pid$pid file;
Step 6: The attach process verifies the socket file permissions;
Step 7: The attach process tests the socket connection availability;
The above details the process of establishing a socket connection, and the following will introduce the protocol for sending commands.
Code location: src/jdk.attach/linux/classes/sun/tools/attach/VirtualMachineImpl.java
InputStream execute(String cmd, Object ... args) throws AgentLoadException, IOException {      // Parameter, socket_path verification
      // create UNIX socket      int s = socket();
      // connect to target VM      try {          connect(s, socket_path);      } catch (IOException x) {          // Error handling      }
      IOException ioe = null;
      // Send attach request information      try {          // Send protocol          writeString(s, PROTOCOL_VERSION);          // Send command          writeString(s, cmd);          // Send parameters, up to three parameters          for (int i=0; i<3; i++) {              if (i < args.length && args[i] != null) {                writeString(s, (String)args[i]);              } else {                // No parameters, send an empty string instead                 writeString(s, "");              }          }      } catch (IOException x) {          ioe = x;      }
      // Read the execution result      SocketInputStream sis = new SocketInputStream(s);
      // Read the execution status of the command      int completionStatus;      try {          completionStatus = readInt(sis);      } catch (IOException x) {          // Error handling      }
      if (completionStatus != 0) {          // Error handling      }
      return sis;}
From the above code, we can know that when a command is sent, the version protocol is sent first, then the command, and finally the parameters, and the number of parameters is up to 3.
In order to see the content of the communication protocol more clearly, the strace command can be used on Linux to track the attach system call process.
strace -f java Main 2> main.outFind the attach communication process in the main.out file. From the beginning of the write part, we can see that the protocol number, command, and command parameters are written in sequence, and then the return result is read.
// Establish UDS link[pid 31412] socket(AF_LOCAL, SOCK_STREAM, 0) = 6[pid 31412] connect(6, {sa_family=AF_LOCAL, sun_path="/tmp/.java_pid27730"}, 110) = 0// Start writing[pid 31412] write(6, "1", 1) = 1 // Protocol number[pid 31412] write(6, "\0", 1) = 1 // Separator[pid 31412] write(6, "properties", 10) = 10 // Command[pid 31412] write(6, "\0", 1) = 1 // Separator[pid 31412] write(6, "\0", 1 <unfinished ...> // Parameter 1[pid 31412] write(6, "\0", 1) = 1 // Parameter 2[pid 31412] write(6, "\0", 1) = 1 // Parameter 3// Read the returned result[pid 31412] read(6, "0", 1) = 1[pid 31412] read(6, "\n", 1) = 1[pid 31412] read(6, "#Thu Jul 27 17:52:11 CST 2023\nja"..., 128) = 128[pid 31412] read(6, "oot.loader\nsun.boot.library.path"..., 128) = 128[pid 31412] read(6, "poration\njava.vendor.url=http\\:/"..., 128) = 128[pid 31412] read(6, ".pkg=sun.io\nuser.country=CN\nsun."..., 128) = 128[pid 31412] read(6, "e=Java Virtual Machine Specifica"..., 128) = 128Therefore, the sending protocol of the Attach client can be summarized as the following string sequence.
1 byte PROTOCOL_VERSION1 byte '\0'n byte command1 byte '\0'n byte arg11 byte '\0'n byte arg21 byte '\0'n byte arg31 byte '\0'1.2.2 Attach server source code analysis
Let’s take a look at how the server that receives the Attach command is implemented. This part of the code is in C/C++ language, but it is not difficult to understand. Take the Linux system as an example to explain how the target JVM handles the Attach request and executes the specified command.
The creation process of the Attach mechanism signal and thread under the Linux system can be described as Figure 3 below.
Figure 3 Attach mechanism signal and thread processing flow
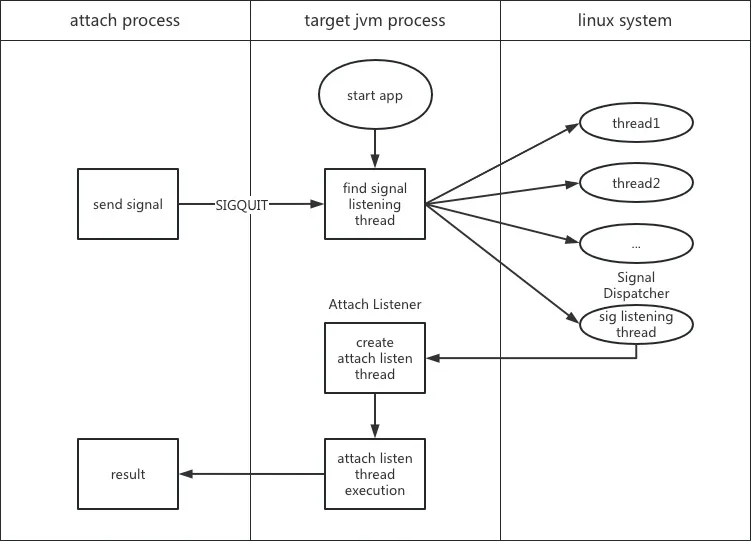
First, let’s take a look at how the target JVM handles the kill -3 signal. Two threads will be created during the JVM
initialization process. The thread names are Signal Dispatcher and Attach Listener. The Signal Dispatcher thread is
used to process semaphores, and the Attach Listener thread is used to respond to Attach requests.
The initialization of JVM threads is in Threads::create_vm, and of course the threads related to Attach are also
initialized in this method.
Code location: src/hotspot/share/runtime/thread.cpp
// Code location src/hotspot/share/runtime/thread.cppjint Threads::create_vm(JavaVMInitArgs* args, bool* canTryAgain) {
    // Parameter and system initialization, omitted....
    // Initialize Signal Dispatcher thread to support semaphore processing    os::initialize_jdk_signal_support(CHECK_JNI_ERR);
    // The target JVM does not disable the Attach mechanism    if (!DisableAttachMechanism) {        // Delete the existing communication file.java_pid$pid when the JVM starts         AttachListener::vm_start();
        // If the JVM startup parameter is set to -XX:+StartAttachListener or        // Reduce the use of semaphores and cannot delay startup, initialize Attach Listener when the JVM starts        // By default, AttachListener is in delayed start mode, that is, the Attach Listener thread is not created immediately when the JVM starts.        if (StartAttachListener || AttachListener::init_at_startup()) {        // Initialize the Attach Listener thread             AttachListener::init();        }}
     // Parameter and system initialization, omitted....}
In the above code, the Signal Dispatcher and Attach Listener threads are initialized respectively. The Signal Dispatcher is initialized when the JVM starts, and the Attach Listener is initialized lazily. The following describes the initialization process of each in detail.
1.2.2.1 Signal Dispatcher thread
The implementation code of initialize_jdk_signal_support is as follows:
Code location: src/hotspot/share/runtime/os.cpp
// Code location src/hotspot/share/runtime/os.cpp// Initialize JDK signal support systemvoid os::initialize_jdk_signal_support(TRAPS) {    // No prohibition on the use of semaphores    if (!ReduceSignalUsage) {
        // Thread name Signal Dispatcher        const char thread_name[] = "Signal Dispatcher";
        // ... Thread initialization process
        // Set thread entry signal_thread_entry        JavaThread* signal_thread = new JavaThread(&signal_thread_entry);
        // ...
        // Register SIGBREAK signal processing handler        os::signal(SIGBREAK, os::user_handler());    }}
JVM creates a separate thread to implement signal processing. The thread name is Signal Dispatcher. The entry point of this thread is the signal_thread_entry function. Entry function code:
Code location src/hotspot/share/runtime/os.cpp
#ifndef SIGBREAK#define SIGBREAK SIGQUIT // SIGBREAK is SIGQUIT#endif
// Signal Dispatcher thread entrystatic void signal_thread_entry(JavaThread* thread, TRAPS) {    os::set_priority(thread, NearMaxPriority);    // Process signal    while (true) {        int sig;        {            sig = os::signal_wait(); // Block waiting for signal        }        if (sig == os::sigexitnum_pd()) {            // Stop Signal Dispatcher signal processing thread            return;        }
        // Loop to process various signals        switch (sig) {            // When SIGBREAK signal is received, execute the following code            case SIGBREAK: {
                // If the attach mechanism is not disabled and it is an attach request, initialize AttachListener                // If AttachListener is not initialized, initialize it and return true                if (!DisableAttachMechanism && AttachListener::is_init_trigger()) {                    continue;                }
                // If the above conditions are not met, print thread stack and other information                VM_PrintThreads op;                VMThread::execute(&op); // Thread stack information                VM_PrintJNI jni_op;                VMThread::execute(&jni_op);// Number of JNI global references                VM_FindDeadlocks op1(tty);                VMThread::execute(&op1); // Deadlock information                Universe::print_heap_at_SIGBREAK(); // Heap and metaspace usage ratio
                // Enable -XX:+PrintClassHistogram, then force a full GC                if (PrintClassHistogram) {                    // The following true means force full GC before heap inspection                    VM_GC_HeapInspection op1(tty, true);                    VMThread::execute(&op1);                }                if (JvmtiExport::should_post_data_dump()) {                     JvmtiExport::post_data_dump();                }                break;            }            default: {                // Dispatch the signal to java                // ...other signal processing            }        }    }}
Lines 1 to 3 define the macro SIGBREAK. It can be seen that the SIGBREAK signal is SIGQUIT. The DisableAttachMechanism parameter in line 26 of the code can disable attach. The default value is false, which means that attach is allowed.
Let’s take a look at the implementation of AttachListener::is_init_trigger.
Code location: src/hotspot/os/linux/attachListener_linux.cpp
// If the file .attach_pid$pid exists in the JVM working directory or /tmp directory// Indicates that the attach mechanism is startedbool AttachListener::is_init_trigger() {    // Record the initial state of AttachListener    // JVM uses a global variable _is_initialized to record the state of AttachListener    if (init_at_startup() || is_initialized()) {        // AttachListener has been initialized or is already initialized when the JVM starts        return false;    }
    // Check if .attach_pid exists    char fn[PATH_MAX + 1];    int ret;    struct stat64 st;    sprintf(fn, ".attach_pid%d", os::current_process_id());    RESTARTABLE(::stat64(fn, &st), ret);    if (ret == -1) {        // .attach_pid file does not exist, print log, code omitted...    }
    // .attach_pid file of the current process exists, create AttachListener thread    if (ret == 0) {        // attach file permission check (root permission or same permission)        if (os::Posix::matches_effective_uid_or_root(st.st_uid)) {            // Create AttachListener thread            init();            return true;        }    }    return false;}
After the Signal Dispatcher thread receives the SIGBREAK signal, there are two processing methods. The first is to initialize the AttachListener thread; the second is to print snapshot information such as the thread stack. The processing method depends on whether the .attach_pid handshake file exists. If it exists, the init method of AttachListener is called, and true is returned after successful initialization.
1.2.2.2 Attach Listener
The Attach mechanism processes related commands through the Attach Listener thread. Let’s take a look at how the Attach Listener thread is initialized. From the above code analysis, it can be seen that AttachListener can be initialized when the JVM starts (immediate initialization) or after the first SIGBREAK signal is received, the Signal Dispatcher thread completes the initialization (delayed initialization).
Let’s take a look at the Attach Listener initialization process.
Code location: src/hotspot/os/linux/attachListener_linux.cpp
void AttachListener::init() {
    // Thread name Attach Listener    const char thread_name[] = "Attach Listener";
    // ... Thread initialization process
    // Set the entry function of the AttachListener thread attach_listener_thread_entry    JavaThread* listener_thread = new JavaThread(&attach_listener_thread_entry);
    // ... Set the thread state}
The above code initializes a thread and sets the entry function of the thread. Focus on the analysis of the attach_listener_thread_entry function.
Code location: src/hotspot/share/services/attachListener.cpp
// Attach Listener thread gets the operation command from the queue and executes the function corresponding to the commandstatic void attach_listener_thread_entry(JavaThread* thread, TRAPS) {    // STEP1: AttachListener initialization    if (AttachListener::pd_init() != 0) {        return;    }    // STEP2: Set the global state of AttachListener    AttachListener::set_initialized();
    for (;;) {        // STEP3: Get AttachOperation from the queue        AttachOperation* op = AttachListener::dequeue();        // find the function to dispatch too        AttachOperationFunctionInfo* info = NULL;        for (int i=0; funcs[i].name != NULL; i++) {            const char* name = funcs[i].name;            if (strcmp(op->name(), name) == 0) {                info = &(funcs[i]); break;            }        }        // dispatch to the function that implements this operation        // ... perform specific operations        res = (info->func)(op, &st);        //...    }}
Step 1: First perform the initialization operation of the AttachListener socket;
Step 2: After the initialization is completed, set the state of AttachListener to initialized;
Step 3: Take AttachOperation from the queue, and call the corresponding processing function to process and return the result.
The following is a detailed analysis of this process.
AttachListener::pd_init
Code location: src/hotspot/os/linux/attachListener_linux.cpp
int AttachListener::pd_init() {
    // Initialization operation under Linux system    int ret_code = LinuxAttachListener::init();
    // ...
return ret_code;}
The actual execution is LinuxAttachListener::init, and the initialization logic is different in different operating systems. LinuxAttachListener::init is actually executed in Linux system.
Code location: src/hotspot/os/linux/attachListener_linux.cpp
// Create a socket and listen to the socket fileint LinuxAttachListener::init() {     char path[UNIX_PATH_MAX]; // socket file     char initial_path[UNIX_PATH_MAX]; // socket file during setup     int listener; // listener socket (file descriptor)
     //register function to cleanup     ::atexit(listener_cleanup);
     int n = snprintf(path, UNIX_PATH_MAX, "%s/.java_pid%d",     os::get_temp_directory(), os::current_process_id());     if (n < (int)UNIX_PATH_MAX) {        n = snprintf(initial_path, UNIX_PATH_MAX, "%s.tmp", path);     }     if (n >= (int)UNIX_PATH_MAX) {        return -1;     }
     // create the listener socket     listener = ::socket(PF_UNIX, SOCK_STREAM, 0);     if (listener == -1) {        return -1;     }
     //Bind socket     struct sockaddr_un addr;     memset((void *)&addr, 0, sizeof(addr));     addr.sun_family = AF_UNIX;     strcpy(addr.sun_path, initial_path);     ::unlink(initial_path);     int res = ::bind(listener, (struct sockaddr*)&addr, sizeof(addr));     if (res == -1) {        ::close(listener);        return -1;     }
     // Turn on listening     res = ::listen(listener, 5);     if (res == 0) { RESTARTABLE(::chmod(initial_path, S_IREAD|S_IWRITE), res);       if (res == 0) {           // make sure the file is owned by the effective user and effective group           // e.g. the group could be inherited from the directory in case the s bit is set           RESTARTABLE(::chown(initial_path, geteuid(), getegid()), res);           if (res == 0) {              res = ::rename(initial_path, path);           }       }     }     if (res == -1) {         ::close(listener);         ::unlink(initial_path);         return -1;     }     set_path(path);     set_listener(listener);
     return 0;}
The AttachListener::pd_init() method calls the LinuxAttachListener::init() method to complete the creation and monitoring of the socket.
LinuxAttachListener::dequeue
The execution logic of the for loop is briefly summarized as the following steps:
- Pull an AttachOperation object to be executed from the dequeue;
- Query the matching command processing function;
- Execute the matched command execution function and return the result;
The entire operation function table of AttachOperation is as follows:
Code location: src/hotspot/share/services/attachListener.cpp
static AttachOperationFunctionInfo funcs[] = { { "agentProperties", get_agent_properties }, { "datadump", data_dump }, { "dumpheap", dump_heap }, { "load", load_agent }, { "properties", get_system_properties }, { "threaddump", thread_dump }, { "inspectheap", heap_inspection }, { "setflag", set_flag }, { "printflag", print_flag }, { "jcmd", jcmd }, { NULL, NULL }};For loading Agent, the corresponding command is the load above. Now, we know the general working mode of Attach Listener, but we are still not sure where the task comes from. The secret is hidden in the line of code AttachListener:: dequeue. Next, let’s analyze the dequeue function:
Code location: src/hotspot/os/linux/attachListener_linux.cpp
LinuxAttachOperation* LinuxAttachListener::dequeue() { for (;;) { // Wait for the attach process to connect to the socket struct sockaddr addr; socklen_t len = sizeof(addr); RESTARTABLE(::accept(listener(), &addr, &len), s); // Verify the permissions of the attach process struct ucred cred_info; socklen_t optlen = sizeof(cred_info); if (::getsockopt(s, SOL_SOCKET, SO_PEERCRED, (void*)&cred_info, &optlen) == -1) { ::close(s); continue; } // Read the socket to get the object of the operation LinuxAttachOperation* op = read_request(s); return op; }}The dequeue method is a for loop, which will use the accept method in a loop to accept the data transmitted from the socket, and after verifying that the uid and gid of the other end of the communication are the same as its own euid and egid, it executes the read_request method to read the content from the socket and package the content into an instance of the AttachOperation class. Next, let’s see how read_request parses the socket data stream.
Code location: src/hotspot/os/linux/attachListener_linux.cpp
LinuxAttachOperation* LinuxAttachListener::read_request(int s) {    // Calculate the maximum length of the buffer, omitted...
    char buf[max_len];    int str_count = 0;
    // Write data stream to buf    // Including version, remove the delimiter code of command data "\0"    // Version protocol verification, etc., omitted...
    // Parameter traversal    ArgumentIterator args(buf, (max_len)-left);
    // Protocol version    char* v = args.next();    // Command name    char* name = args.next();    if (name == NULL || strlen(name) > AttachOperation::name_length_max) {        return NULL;    }
    // Create AttachOperation object    LinuxAttachOperation* op = new LinuxAttachOperation(name);
    // Read AttachOperation parameters from buf    for (int i=0; i<AttachOperation::arg_count_max; i++) {        char* arg = args.next();        if (arg == NULL) {            op->set_arg(i, NULL);        } else {            if (strlen(arg) > AttachOperation::arg_length_max) {                delete op;                return NULL;            }            op->set_arg(i, arg);        }    }
    // Set the socket reference to the op object    op->set_socket(s);    return op;}
This is the implementation on Linux, and different operating systems have different implementations. The Attach Listener thread listens to the .java_pid file, waits for the Attach client to initiate a connection, parses the Attach request information of the Attach client, packages the requested byte stream into an object of type AttachOperation, and then queries the corresponding processing function from the table, processes it, and returns the processing result.
The detailed interaction process of the Attach mechanism can be described by the following Figure 4.
Figure 4 Attach interaction processing flow
1.2.3 JVM parameters involved in the Attach mechanism
Here we summarize the JVM parameters involved in the Attach mechanism. As shown in Table 1 below.
Table 1 JVM parameters related to the Attach mechanism
| Name | Meaning | Default value |
|---|---|---|
| ReduceSignalUsage | Disable semaphore usage | false |
| DisableAttachMechanism | Disable attach to current JVM | false |
| StartAttachListener | Initialize AttachListener when JVM starts | false |
| EnableDynamicAgentLoading | Allow runtime loading of Agent | true |
JVM parameters are defined in src/hotspot/share/runtime/globals.hpp
1.3 Attach open source tool
1.3.1 Implementing Attach injection tool using golang
In the previous section, the entire process of establishing Attach communication and sending data was analyzed in detail. This section will use the Golang language to build a lightweight Attach tool and use the Attach tool to obtain the stack information of the target JVM. The code comes from the open source project: https://github.com/tokuhirom/go-hsperfdata
1.3.1.1 Establish communication
- Execute attach
Code location: attach/attach_linux.go
// Execute attachfunc force_attach(pid int) error {    // Create .attach_pid file in the working directory of the process    attach_file := fmt.Sprintf("/proc/%d/cwd/.attach_pid%d", pid, pid)    f, err := os.Create(attach_file)    if err != nil {        return fmt.Errorf("Canot create file:%v:%v", attach_file, err)    }    f.Close()
    // Send SIGQUIT signal to the target JVM    err = syscall.Kill(pid, syscall.SIGQUIT)    if err != nil {        return fmt.Errorf("Canot send sigkill:%v:%v", pid, err)    }
    // Check if the .java_pid file exists    sockfile := filepath.Join(os.TempDir(), fmt.Sprintf(".java_pid%d", pid))    for i := 0; i < 10; i++ {        if exists(sockfile) {            return nil        }        time.Sleep(200 * time.Millisecond)        }        return fmt.Errorf("Canot attach process:%v", pid)    }
    // Establish UDS communication with the target JVM    func GetSocketFile(pid int) (string, error) {      sockfile := filepath.Join(os.TempDir(), fmt.Sprintf(".java_pid%d", pid))       if !exists(sockfile) {           err := force_attach(pid)           if err != nil {           return "", err       }     }     return sockfile, nil}
func exists(name string) bool { if _, err := os.Stat(name); err != nil { if os.IsNotExist(err) { return false } } return true}- Connect to the UDS of the target JVM
Code location: attach/attach_linux.go
//Connect UDSfunc New(pid int) (*Socket, error) {     sockfile, err := GetSocketFile(pid)     if err != nil {        return nil, err     }
    addr, err := net.ResolveUnixAddr("unix", sockfile)    if err != nil {        return nil, err    }
    c, err := net.DialUnix("unix", nil, addr)    if err != nil {        return nil, err    }    return &Socket{c}, nil}
force_attach method creates the attach_pid file and sends a kill -3 signal to the target JVM, then connects to the UDS
created by the target JVM.
1.3.1.2 Send commands and parameters
Code location: attach/attach.go
const PROTOCOL_VERSION = "1"const ATTACH_ERROR_BADVERSION = 101
type Socket struct {    sock *net.UnixConn}
// Execute commandfunc (sock *Socket) Execute(cmd string, args ...string) error {    // Write protocol version    err := sock.writeString(PROTOCOL_VERSION)    if err != nil {        return err    }    // Write command string    err = sock.writeString(cmd)    if err != nil {        return err    }    // Write parameters    for i := 0; i < 3; i++ {        if len(args) > i {err = sock.writeString(args[i])            if err != nil {                return err            }        } else {            err = sock.writeString("")            if err != nil {                return err            }        }    }    // Read execution results    i, err := sock.readInt()    if i != 0 {        if i == ATTACH_ERROR_BADVERSION {            return fmt.Errorf("Protocol mismatch with target VM")        } else {            return fmt.Errorf("Command failed in target VM")        }    }    return err}
The main function of the above code is the Execute method, which writes the specified character sequence to the
socket.
1.3.1.3 Get the stack information of the target JVM
Let’s take a look at the main method, which accepts the pid parameter and dumps the stack information of the target JVM.
//threaddumpfunc main() {     if len(os.Args) == 1 {         fmt.Printf("Usage: jstack pid\n")         os.Exit(1)     }     pid, err := strconv.Atoi(os.Args[1])     if err != nil {        log.Fatal("invalid pid: %v", err)     }
     sock, err := attach.New(pid)     if err != nil {        log.Fatalf("cannot open unix socket: %s", err)     }     err = sock.Execute("threaddump")     if err != nil {        log.Fatalf("cannot write to unix socket: %s", err)     }
     stack, err := sock.ReadString()     fmt.Printf("%s\n", stack)}
Output result:
$ ./main 751932023-07-29 01:58:32Full thread dump Java HotSpot(TM) 64-Bit Server VM (11.0.2+9-LTS mixed mode):
Threads class SMR info:_java_thread_list=0x00007fc8a5f83fe0, length=11, elements={0x00007fc8a68e4800, 0x00007fc8a68e9800, 0x00007fc8a705f000, 0x00007fc8a7055000,0x00007fc8a7062000, 0x00007fc8a68f3800, 0x00007fc8a6068800, 0x00007fc8a8043800,0x00007fc8a68e6800, 0x00007fc8a9813800, 0x00007fc8a71ac000}
"Signal Dispatcher" #4 daemon prio=9 os_prio=31 cpu=12.90ms elapsed=236130.65s tid=0x00007fc8a705f000 nid=0x3c03 runnable [0x0000000000000000] java.lang.Thread.State: RUNNABLE
"C2 CompilerThread0" #5 daemon prio=9 os_prio=31 cpu=1845.75ms elapsed=236130.65s tid=0x00007fc8a7055000 nid=0x3d03 waiting on condition [0x00000000000000000] java.lang.Thread.State: RUNNABLE No compile task

//Omitted due to limited space...
1.3.2 jattach
1.3.2.1 Introduction
jattach is a runtime injection tool that does not depend on jdk/jre, and has functions such as jmap, jstack, jcmd and jinfo, and supports operating systems such as linux, windows and macos. Project address: https://github.com/jattach/jattach
1.3.2.2 attach source code analysis
Code location: src/posix/jattach.c
int jattach(int pid, int argc, char** argv) {    // Get user permissions for the attach process and the target JVM process    uid_t my_uid = geteuid();    gid_t my_gid = getegid();    uid_t target_uid = my_uid;    gid_t target_gid = my_gid;    int nspid;    if (get_process_info(pid, &target_uid, &target_gid, &nspid) < 0) {        fprintf(stderr, "Process %d not found\n", pid);        return 1;    }
    // Support injection of processes within the container: enter the container's namespace    enter_ns(pid, "net");    enter_ns(pid, "ipc");    int mnt_changed = enter_ns(pid, "mnt");
    // Switch process permissions here    // On the HotSpot virtual machine, dynamic attach requires the process initiating the attach to have the same permissions as the target process    // If the attach process permissions are root (privileged process), you can automatically switch to the target process permissions    if ((my_gid != target_gid && setegid(target_gid) != 0) ||    (my_uid != target_uid && seteuid(target_uid) != 0)) {        perror("Failed to change credentials to match the target process");        return 1;    }
    get_tmp_path(mnt_changed > 0 ? nspid : pid);
    signal(SIGPIPE, SIG_IGN);
    if (is_openj9_process(nspid)) {        return jattach_openj9(pid, nspid, argc, argv);    } else {        // Attach to hotspot virtual machine        return jattach_hotspot(pid, nspid, argc, argv);    }}
It should be noted that before initiating the attach, the permissions of the attach process need to be set to be consistent with the permissions of the target JVM. jattach has compiled executable files for various platforms for us, which is very useful for building cross-platform runtime injection tools. We only need to use it without worrying about the implementation inside.
1.3.2.3 Support Java process injection in container
It should be noted that jattach supports Java process injection into container, and the implementation principle is as follows:
1.4 Common pitfalls of Attach
1.4.1 Differences in the results returned by different versions of JDK after Attach is successful
- Phenomenon
When JDK11 is used to attach JDK8 application, the exception com.sun.tools.attach.AgentLoadException: 0 will be thrown, but in fact, the attach has been successful. The exception result is as follows:
Start arthas failed, exception stack trace: com.sun.tools.attach.AgentLoadException: 0at jdk.attach/sun.tools.attach.HotSpotVirtualMachine.loadAgentLibrary(HotSpotVirtualMachine.java:108)at jdk.attach/sun.tools.attach.HotSpotVirtualMachine.loadAgentLibrary(HotSpotVirtualMachine.java:119)at jdk.attach/sun.tools.attach.HotSpotVirtualMachine.loadAgent(HotSpotVirtualMachine.java:147)- Reason
The return value of the HotSpotVirtualMachine#loadAgentLibrary method is different in different JDKs. In JDK8, returning 0 means that the attach is successful.
Code location: src/share/classes/sun/tools/attach/HotSpotVirtualMachine.java
private void loadAgentLibrary(String agentLibrary, boolean isAbsolute, String options)throws AgentLoadException, AgentInitializationException, IOException{    InputStream in = execute("load",    agentLibrary,    isAbsolute ? "true" : "false",    options);    try {        // Return 0 to indicate successful attach        int result = readInt(in);        if (result != 0) {            throw new AgentInitializationException("Agent_OnAttach failed", result);        }    } finally {        in.close();
    }}
JDK11 returns “return code: 0” to indicate successful attach.
private void loadAgentLibrary(String agentLibrary, boolean isAbsolute, String options) throws AgentLoadException, AgentInitializationException, IOException{ //return results String msgPrefix = "return code: "; InputStream in = execute("load", agentLibrary, isAbsolute ? "true" : "false", options); try (BufferedReader reader = new BufferedReader(new InputStreamReader(in))) { String result = reader.readLine(); if (result == null) { throw new AgentLoadException("Target VM did not respond"); } else if (result.startsWith(msgPrefix)) { int retCode = Integer.parseInt(result.substring(msgPrefix.length())); // "return code: 0" indicates successful attachment if (retCode != 0) { throw new AgentInitializationException("Agent_OnAttach failed", retCode); } } else { throw new AgentLoadException(result); } }}- Solution
The process that initiates Attach needs to be compatible with the results returned by different versions of JDK. The following is the compatibility solution of the arthas diagnostic tool for this problem:
Code location: arthas/core/src/main/java/com/taobao/arthas/core/Arthas.java
try { virtualMachine.loadAgent(arthasAgentPath, configure.getArthasCore() + ";" + configure.toString()); } catch (IOException e) { // Processing return value is "return code: 0" if (e.getMessage() != null && e.getMessage().contains("Non-numeric value found")) { AnsiLog.warn(e); AnsiLog.warn("It seems to use the lower version of JDK to attach the higher version of JDK."); AnsiLog.warn( "This error message can be ignored, the attach may have been successful, and it will still try to connect."); } else { throw e; } } catch (com.sun.tools.attach.AgentLoadException ex) { // Processing return value is "0" if ("0".equals(ex.getMessage())) { // https://stackoverflow.com/a/54454418 AnsiLog.warn(ex); AnsiLog.warn("It seems to use the higher version of JDK to attach the lower version of JDK."); AnsiLog.warn( "This error message can be ignored, the attach may have been successful, and it will still try to connect."); } else { throw ex; }}As can be seen from the above code, after Attach throws an exception, the exception is classified and processed. When IOException is thrown and the message of the exception contains “Non-numeric value found”, it means that the exception is due to the lower version of Attach API attach to a higher version of JDK; When the exception thrown is AgentLoadException and the value of message is “0”, it means that the exception is caused by attaching a higher version of Attach API to a lower version of JDK.
1.4.2 java_pid file is deleted
- Phenomenon
When executing an attach command such as jstack, an error message appears: Unable to open socket file: target process not responding or HotSpot VM not loaded. The error is as follows:
MacBook-Pro admin$ jstack 3300033000: Unable to open socket file: target process not responding or HotSpot VM not loadedThe -F option can be used when the target process is not respondingAnd there is no .java_pid file for attach communication in the /tmp directory.
MacBook-Pro admin$ ls .java_pid3000ls: .java_pid3000: No such file or directoryHowever, after restarting the Java process, you can use attach tools such as jstack again
- Reason
Unfortunately, this is a JDK bug. The reason is that the JVM will create .java_pid for socket communication when it is first attached. The file is in the /tmp directory (the location of the tmp directory is different for different operating systems, and the Linux system is the /tmp directory). This directory cannot be modified by parameters. During the initialization process of the Attach listener, after this file is created for the first time, the JVM will mark the Attach Listener as initialized. If the file is deleted, the Java process cannot be attached.
- Solution
For JDK8, the only solution is to restart the process; community discussion and official fix;
The official fix pr adds INITIALIZING, NOT_INITIALIZED, and INITIALIZED states to Attach Listener, and performs self-checking through AttachListener::check_socket_file in the INITIALIZED state. If the file does not exist, the previous listener will be cleaned up and re-established.
The fix code is as follows. At line 17, the .attach_pid file is checked.
AttachListenerState cur_state = AttachListener::transit_state(AL_INITIALIZING, AL_NOT_INITIALIZED); if (cur_state == AL_INITIALIZING) { // Attach Listener has been started to initialize. Ignore this signal. continue; } else if (cur_state == AL_NOT_INITIALIZED) { // Start to initialize. if (AttachListener::is_init_trigger()) { // Attach Listener has been initialized. //Accept subsequent request. continue; } else { // Attach Listener could not be started. // So we need to transit the state to AL_NOT_INITIALIZED. AttachListener::set_state(AL_NOT_INITIALIZED); } } else if (AttachListener::check_socket_file()) { // .attach_pid file for detection continue;}It should be noted that this bug has been fixed in JDK8u401 and above.
1.4.3 Permission issue of attach process
- Phenomenon
If jstack is executed under the root user, and the target JVM process is not started with root permissions, the execution error is as follows:
Unable to open socket file: target process not responding or HotSpot VM not loadedThe -F option can be used when the target process is not responding- Reason
The following is the process of LinuxAttachListener thread receiving commands on JDK8. At line 26 of the code, it will strictly check whether the uid and gid of the attach process are consistent with the target JVM.
Code location: jdk8/src/hotspot/os/linux/vm/attachListener_linux.cpp
LinuxAttachOperation* LinuxAttachListener::dequeue() { for (;;) { int s;
// wait for client to connect struct sockaddr addr; socklen_t len = sizeof(addr); RESTARTABLE(::accept(listener(), &addr, &len), s); if (s == -1) { return NULL; // log a warning? }
// get the credentials of the peer and check the effective uid/guid // - check with jeff on this. struct ucred cred_info; socklen_t optlen = sizeof(cred_info); if (::getsockopt(s, SOL_SOCKET, SO_PEERCRED, (void*)&cred_info, &optlen) == -1) { ::close(s); continue; } uid_t euid = geteuid(); gid_t egid =getegid();
// Strictly check uid, gid if (cred_info.uid != euid || cred_info.gid != egid) { ::close(s); continue; }
// peer credential look okay so we read the request LinuxAttachOperation* op = read_request(s); if (op == NULL) { ::close(s); continue; } else { return op; } }}In principle, root permissions should not be restricted, so JDK11 has lifted this “not very reasonable” restriction, and you can use root permissions to attach any Java process started by any user.
Code location: jdk11/src/hotspot/os/linux/attachListener_linux.cpp
LinuxAttachOperation* LinuxAttachListener::dequeue() {     for (;;) {     int s;
     // wait for client to connect     struct sockaddr addr;     socklen_t len = sizeof(addr);     RESTARTABLE(::accept(listener(), &addr, &len), s);     if (s == -1) {        return NULL; // log a warning?     }
     // get the credentials of the peer and check the effective uid/guid     struct ucred cred_info;     socklen_t optlen = sizeof(cred_info);     if (::getsockopt(s, SOL_SOCKET, SO_PEERCRED, (void*)&cred_info, &optlen) == -1) { log_debug(attach)("Failed to get socket option SO_PEERCRED");         ::close(s);         continue;     }     //Allow root permissions to attach     if (!os::Posix::matches_effective_uid_and_gid_or_root(cred_info.uid, cred_info.gid)) {         log_debug(attach)("euid/egid check failed (%d/%d vs %d/%d)",         cred_info.uid, cred_info.gid, geteuid(), getegid());         ::close(s);         continue;     }
     // peer credential look okay so we read the request     LinuxAttachOperation* op = read_request(s);     if (op == NULL) {        ::close(s);     continue;     } else {        return op;     } }}
The implementation of matches_effective_uid_and_gid_or_root is as follows:
Code location: jdk11/src/hotspot/os/linux/attachListener_linux.cpp
bool os::Posix::matches_effective_uid_and_gid_or_root(uid_t uid, gid_t gid) { return is_root(uid) || (geteuid() == uid && getegid() == gid);}- Solution
Switch to the same permissions as the user and then execute Attach. This part of the code has been analyzed in detail when introducing the jattach tool, so I will not repeat it here.
1.4.4 com.sun.tools.attach.AttachNotSupportedException: no providers installed
- Reasons and solutions Because there is a problem with the referenced tools.jar package, tools.jar should be referenced like this
<dependency> <groupId>com.sun</groupId> <artifactId>tools</artifactId> <version>1.5.0</version> <scope>system</scope> <systemPath>/path/to/your/jdk/lib/tools.jar</systemPath></dependency>The systemPath tag is used to specify the local tools.jar location. The absolute path of tools.jar can be configured as a relative path:
<dependency> <groupId>com.sun</groupId> <artifactId>tools</artifactId> <version>1.5.0</version> <scope>system</scope> <systemPath>${env.JAVA_HOME}/lib/tools.jar</systemPath></dependency>